Set up integrations with JUNO
Integration is a way to transfer information from your data management system to your JUNO platform. The development of any integration is a team effort between the Client team and the JUNO team. This guide outlines that process so that you know what to expect.
When to use integration
Integration is an alternative to importing users, using JUNO’s free registration, and/or importing content. It’s an extra cost that’s agreed upon in the contract process.
No integration is needed with JUNO’s free registration. It allows users to create their accounts directly through the JUNO platform. Use this when you have a free event with no ticket types and no system in place that already has registration or member information.
With API registration integration and single sign-on (SSO) integration, our goal is to get users registered on the platform. With Content integration, our goal is to get content onto the platform.
API registration integration
Use this when your users register for the event in one place but have not created a password or other login credentials before. API Registration Integration takes user information from your database and pulls it into your JUNO platform. Then JUNO generates a “magic link” that users click to log in without a password.Single sign-on (SSO) integration
Use this when your users already have login credentials for your organization’s external site. SSO Integration takes user credentials from your database and pulls them into your JUNO platform. This means that people log into JUNO using the same usernames and passwords as on your member sites. When logging in, users are briefly redirected to enter their credentials on your organization’s site, then brought back to JUNO once the credentials are verified.Content integration
Use this when your existing content is already housed on a third-party content management system. Content integration pulls the content directly from that third party and displays it on your JUNO platform.
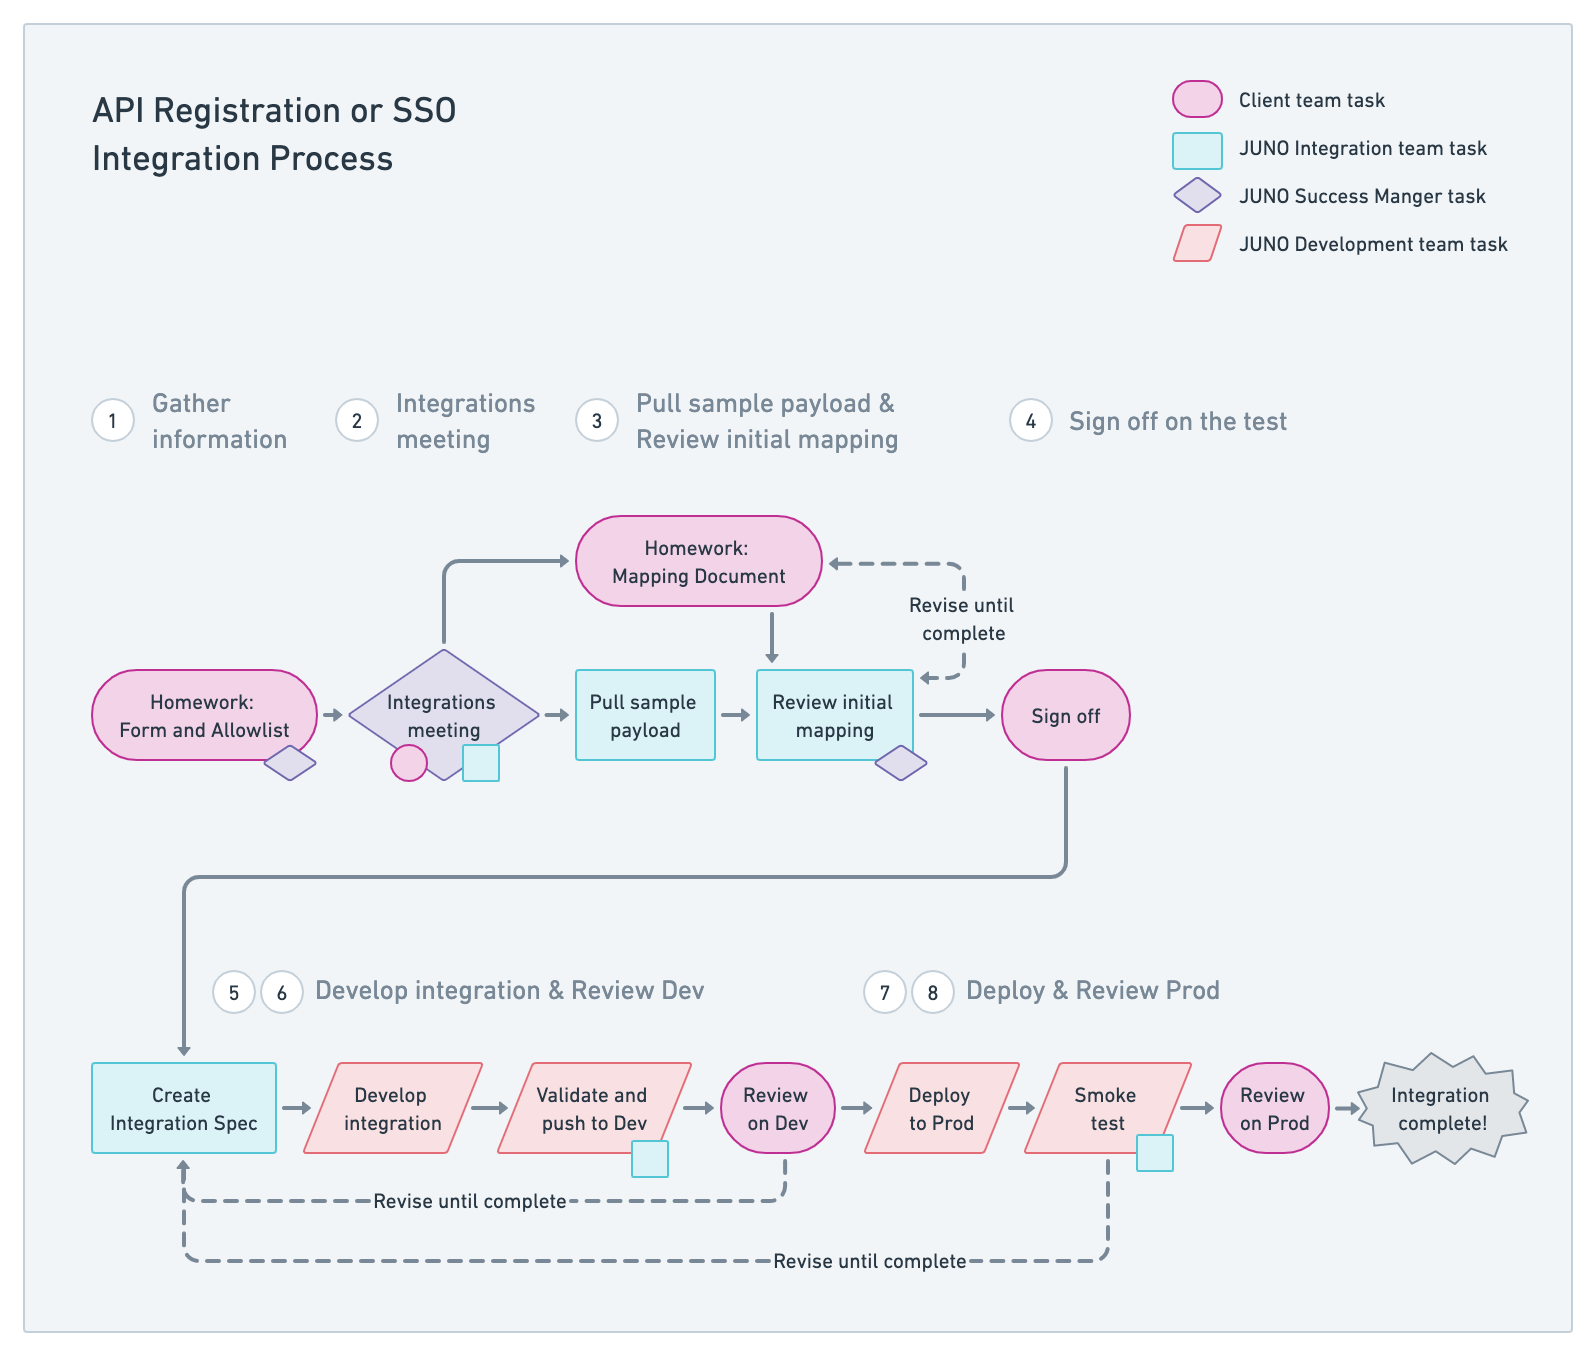
API registration or SSO integration process
The process is the same for both types of integrations.

1. Gather information after kickoff
We need to understand your data, data management system, and goals. This helps us get on the same page so that we can smoothly move data from your system into the JUNO system.
After the kickoff meeting, the JUNO Success Manager sends the Client team a Google form and allowlist to complete as homework.
Your homework, due by the Integrations meeting:
✔ API Registration Integration Form or ✔ SSO Integration Form
✔ Allowlist for Integrations
2. Integrations meeting
During the meeting, the JUNO Success Manager, JUNO Integrations Team, and Client team walk through the mapping document and requirements.
Agenda:
Walk through the tabs of the mapping document.
Go over any specific access codes; Staff, Exhibitor, etc.
Discuss any specific dimensions JUNO should be pulling over from registration; City, Country, etc.
Discuss any business rules.
Discuss attendee communication.
Go over email templates. The Client team will provide images and copy for the email template.
After the meeting, the JUNO Success Manager sends the Client team the mapping document and training video to complete as homework.
Your homework, due by your third meeting with JUNO:
✔ API Registration/SSO Integration Mapping Document
Supporting resources:
🖥 Training Video: How to use the API Registration/SSO Integration Mapping Document
📔 Example completed API Registration/SSO Integration Mapping Document - Spargo
3. JUNO pulls a sample payload and reviews the initial mapping document
Initially, the JUNO Integrations team pulls a sample payload to ensure we can access the endpoint.
Then once the Client team delivers the full mapping document, the JUNO integrations team reviews it. If they have any questions about the data, they bring them to the Client team and make revisions.
4. Sign off on the test
The JUNO team checks the attendee count in the sample payload and shares it with the Client team. If the Client team confirms the count is correct, it’s time for JUNO to begin coding.
You will confirm that this was successful.
5. JUNO develops the integration
The JUNO Success Manager adds the Client team’s tags to the platform. The JUNO Integrations team creates an Integration Spec Document that the JUNO Development team uses to build the integration.
6. Review the testing environment (“Dev”)
In the testing environment, we can see how your site looks while in development. On a weekly call, the JUNO Success Manager reviews a small sample of each user type with the Client team. Together, they look at the users' information in the content management system, on the profile page, and in the directory.
If needed, the JUNO Development team makes edits.
You will approve the testing environment.
7. JUNO deploys to the production environment (“Prod”)
The JUNO Development team pushes the build from the test environment (“Dev”) to the live production site (“Prod”).
8. Review the production environment
The Client team tests users on the production site to ensure the integration is flowing correctly.
When you approve the final build, the integration is complete!
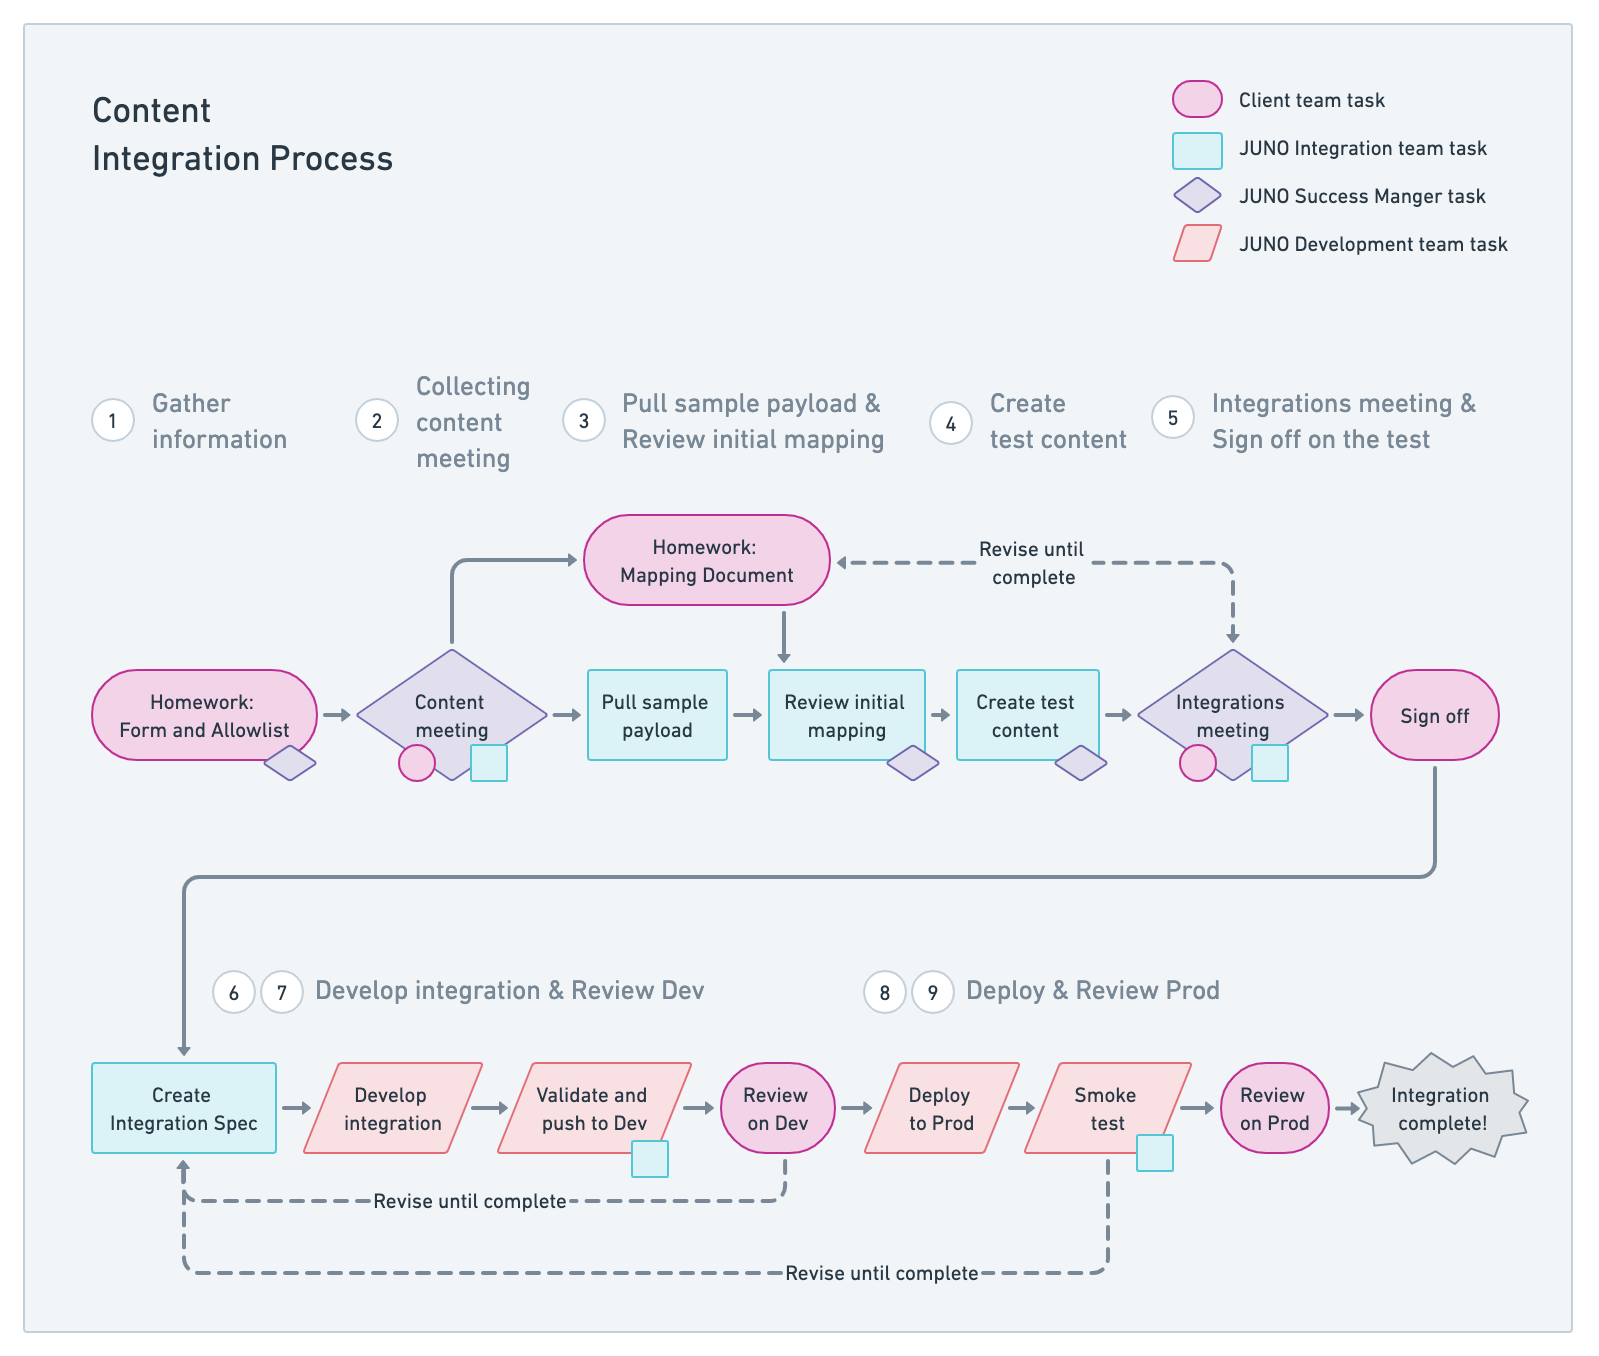
Content integration process

1. Gather information after kickoff
We need to understand your data, data management system, and goals. This helps us get on the same page so that we can smoothly move data from your system into the JUNO system.
After the kickoff meeting, the JUNO Success Manager sends the Client team a Google form and allowlist to complete as homework, along with a mapping document to review.
Your homework, due by the Collecting Content meeting:
✔ Content Integration Form
✔ Allowlist for Integrations
✔ Content Integration Mapping Document (to review only, not to complete yet)
Supporting resources:
🖥 Training video: How to use the Content Integration Mapping Document
📔 Example completed Content Integration Mapping Document - Cadmium
📔 Example completed Content Integration Mapping Document - Confex & A2Z
2. Collecting content meeting
During the content meeting, the JUNO Success Manager and the Client team discuss the mapping document.
Agenda:
Review the Content Integration Form.
Review key milestones and timelines.
Review mapping document needs. Discuss each type of content and discuss how to fill the document out.
Your homework, due by the Integrations meeting:
✔ Complete the Content Integration Mapping Document.
3. JUNO pulls a sample payload and reviews the initial mapping document
Initially, the JUNO Integrations team pulls a sample payload to ensure we can access the endpoint.
Then once the Client team delivers the full mapping document, the JUNO integrations team reviews it. If they have any questions about the data, they bring them to the Client team and make revisions.
4. JUNO creates test content
The JUNO team uses sample data provided by the Client team to map and import test content.
5. Integrations meeting / Sign off on the test content
During the meeting, the JUNO Success Manager, JUNO Integrations Team, and Client team walk through the mapping document and requirements.
Agenda:
Review each tab of the Content Mapping Document.
Address questions from the Integrations Team.
Review the test content. The Client team signs off on the test content, if possible.
Discuss necessary edits.
Discuss a due date for edits and action items.
You will confirm that the test content was successful.
Your homework, due by the discussed date:
✔ Make edits to the Content Integration Mapping Document. Make sure to provide at least 1 piece of complete content per content type. Complete means that all fields that should be mapped are filled out with data.
6. JUNO develops the integration
The JUNO Success Manager adds the Client team’s tags to the platform. The JUNO Integrations team creates an Integration Spec Document that the JUNO Development team uses to build the integration.
7. Review the testing environment (“Dev”)
In the testing environment, we can see how your site looks while in development. On a weekly call, the JUNO Success Manager and Client team review content on the site to make sure it looks correct.
If needed, the JUNO Development team makes edits.
You will approve the testing environment.
8. JUNO deploys to the production environment (“Prod”)
The JUNO Development team pushes the build from the test environment (“Dev”) to the live production site (“Prod”).
9. Review the production environment
The Client team reviews content on the production site to ensure it is correct.
When you approve the final build, the integration is complete!
